Start with the office’s hot-water supply and a place to clean up. A small brewer can fit on a desk, but you also need room for the mug, coffee and wet parts after brewing. If you share the room, consider grinder noise before adding whole beans to the setup.
If the office provides hot water, you can keep the setup very small. An automatic pour-over brewer suits anyone who drinks filter coffee, a portable pump brewer makes a shorter, stronger cup, and an integrated grinder-and-brewer adds fresh grinding, which usually belongs in the kitchenette rather than at a shared desk.
Choose for the room, not the feature list
Decide whether the brewer is for your own desk or a shared kitchen. A single-cup device may suit one person; several colleagues making coffee together may need a larger batch brewer.
| Brewing option | Desk footprint | What it needs | Best office fit | Main drawback |
|---|---|---|---|---|
| Manual pour-over | Very small, some fold flat | Hot water, filter, grounds, a stable cup | Silent brewing at your own desk | You have to stand there and pour |
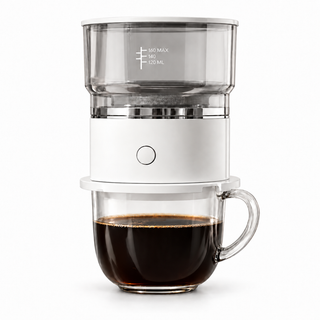
| Automatic pour-over | About 4 in (100 mm) square | Hot water, grounds, a stable cup, two AAA batteries | One filter coffee without hand-pouring over a keyboard | Serving tops out around 160 ml (5.4 fl oz) |
| Portable espresso maker | Tall and narrow, about 2.5 in (65 mm) wide | Pre-heated water, a charge, a capsule or grounds | A short espresso-style drink at 3 p.m. | Most models don't heat water |
| Grinder-and-brewer kit | Tall and narrow, about 1.5 lb (0.7 kg) | Whole beans, hot water, a charge | Fresh grinding within reach of a kitchenette | Grinding noise, and more parts to rinse |
| Countertop pod machine | Medium, permanent | An outlet, the right pods, a filled tank | A shared station in a small office | Needs a dedicated space and generates pod waste |
| Small drip machine | Medium, permanent | An outlet, paper filters, grounds, a carafe | Several colleagues on one routine | Coffee quality declines if left on the hot plate |
Whichever row you land on, count the working area for the full setup: brewer, cup, coffee, and any water container or lid that has to come off and go somewhere.
Check the Office Setup Before Choosing a Brewer
Measure the working footprint, not the product base
Product dimensions describe the device standing still. Measure the area you need while it's working: the brewer, the cup, the water container, the coffee, and whatever lid or basket has to come off. Then keep a dry zone around the keyboard, the power strip, your notebook, and your phone.
A workable desk setup fits on one washable tray or mat you can lift in a single movement when a meeting moves to your desk. Check vertical clearance if there's a shelf above; a tall lid or a plunger needs headroom. If the brewer sits on top of a cup rather than beside it, test that pairing before you commit.
The automatic pour-over brewer is about 100 × 101.5 mm (roughly 4 × 4 in) and 180 g (6.35 oz), which is a coaster's worth of desk. The cup is not included, and you still need clearance to lift off the 160 ml tank and pull the reusable filter after brewing. That second number is the one people forget: a device with a 4-inch base can still need 10 inches (250 mm) of working space.
Settle the hot-water question first
Check whether the electric function heats water or only powers the brewing. Every Yozcoffee brewer in this guide is battery-powered and none of them heats water, so don't assume a rechargeable device is self-heating.
For the example pour-over recipes in this guide, water around 90–96°C (194–205°F) is a useful starting range. Check the actual dispenser or kettle rather than assuming office hot water reaches that temperature.
An insulated bottle lets you carry hot water from the kitchenette. Test how well it holds temperature over the time you usually wait, and pick a capacity that covers the full recipe rather than most of it.
Check the serving against your usual mug
Compact brewers make small servings. That's ideal for a focused afternoon coffee and disappointing for someone who works through a 12-ounce mug before the first meeting.
The 160 ml automatic pour-over uses a reusable steel filter and a rotating water tank with 120, 140, and 160 ml marks (about 4 to 5.4 fl oz). It makes filter coffee, not pressure-brewed espresso. Those marks measure water added; the grounds hold some of it back, so don't treat 160 ml as a guaranteed finished cup. If your mug is bigger, the 350 ml rotating pour-over brewer covers a fuller serving with paper filters and USB-C charging.
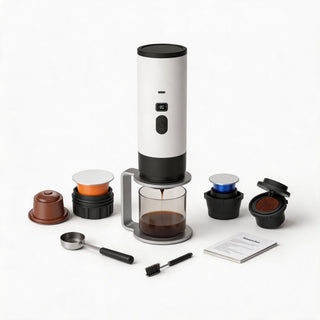
A portable espresso maker makes a much shorter, denser drink. The rechargeable pump model takes compatible NS Original-style capsules or a reusable basket for grounds, and shows battery level and water temperature on a small display. It needs pre-heated water. At roughly 65 × 240 mm (2.56 × 9.45 in) it uses almost no desk width but wants a tall drawer or a bag pocket to live in.
For milk drinks, add refrigerated storage, a heating or foaming step, and the cleanup to your plan. A short-coffee brewer doesn't handle any of those on its own.
Treat noise as an office specification
Noise figures are rarely published, and when they are, they aren't measured on the same basis. Compare the type of operation instead: a rotating pour-over tank is close to silent, a pump brewer hums for a few seconds, and an electric grinder is the one thing in this guide that colleagues will hear.
So test grinding in the actual room. Noise varies with the model and the surface it sits on, and if it would interrupt a call, grind in the kitchenette or bring pre-ground portions.
If fresh grinding matters to you, agree on a place and a time for it. Grinding once in the kitchenette and carrying the dose back is more considerate and barely slower than grinding at the desk. Pre-dosed ground coffee is quieter still, and it keeps open bags, scoops, and loose chaff away from a keyboard; loose chaff can get under keycaps.
Choose the coffee format that creates the least clutter
Capsules are the tidiest format on a desk, as long as you confirm the exact capsule standard and toss used pods promptly instead of stacking them next to the monitor. Keep unused capsules in a closed container so they don't scatter.
Ground coffee gives more choice and works with pour-over and reusable baskets. It also produces fines that end up on the desk, and it needs a scoop or pre-measured portions. Whole beans preserve the grind-at-brew workflow and add a grinder, noise, and a brush to the kit. If you'd rather sort out the grinder first, the burr grinder range is a better starting point than the brewer.
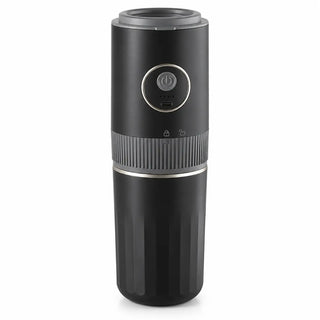
An integrated unit cuts down on loose accessories. The electric grinder and pour-over brewer puts a USB-C grinder, a reusable steel filter, the dripper, and a 350 ml (11.8 fl oz) stainless cup into one stackable body of roughly 8 × 8 × 24.5 cm (3.15 × 3.15 × 9.65 in). External hot water is still required. The 1500 mAh battery powers grinding only, and the assembled kit weighs around 0.7 kg (1.54 lb): unremarkable on a counter, noticeable in a bag you carry to the office and home again five days a week.
Plan the sink trip before the first brew
Choose a brewer you can clean within the break you normally take, not the break you wish you took.

Let hot parts cool, knock the puck or the spent grounds into a trash can, then rinse only the pieces that touched coffee. Wipe the outside and let everything dry before it goes back in a drawer or a closed pouch; damp parts can develop odors in a sealed bag. Keep motors, battery compartments, and charging ports away from water unless the manual specifically allows it.
Paper filters bundle the grounds for disposal and cost a little per cup. Reusable mesh avoids paper but needs a rinse and time to dry. Choose the filter type you can clean or dispose of during your break.
Personal desk or shared kitchenette?
| Workspace | Prioritize | Avoid |
|---|---|---|
| Quiet personal desk | A small tray, low noise, sealed portions, a cup that doesn't tip | Grinding during calls, and open bags of grounds near a keyboard |
| Hot desk or coworking space | A kit that packs in one pouch and wipes down in a minute | Loose parts scattered across shared cabinets |
| Small office kitchenette | A labeled owner, easy-rinse parts, shared hot water | One person's device holding the only outlet all day |
| Shared team brewer | Real capacity, instructions on the wall, a named cleaning schedule | Single-serve cycles for a team of eight |
If colleagues will share the brewer, compare batch capacity and agree on who refills and cleans it. A single-cup device may mean long waits when several people want coffee.
Two office options: automate grinding or automate pouring?
Once you know the type of brewer you want, the practical question for a desk is which step you'd rather hand off. These two Yozcoffee options solve different jobs. Both need hot water prepared separately; neither is an all-in-one heating coffee machine.
| Check | Grinder and manual pour-over kit | 350 ml rotating pour-over brewer |
|---|---|---|
| Product | Electric grinder and brewer | Coffee Maker + 40 Free Filters |
| Automated step | Grinding whole beans | Distributing water over the grounds |
| You do | Remove the powered grinder, then pour hot water by hand | Prepare ground coffee, a paper filter, and hot water |
| Cup and filter | 350 ml cup and reusable steel filter included | Cup not included; paper filters required, 40 in the box |
| Power | USB-C, 1500 mAh, about 7–8 grinds per charge | USB-C rechargeable |
| Fit check | About 8 × 8 × 24.5 cm (3.15 × 3.15 × 9.65 in) packed; allow working space | About 14 cm wide × 13 cm tall (5.5 × 5.1 in); cup opening 5–10 cm (2–4 in) |
Choose the grinder kit if fresh grinding and an included cup matter most and you can grind somewhere the noise won't bother anyone. Choose the rotating brewer if you already have ground coffee and a suitable mug and want less hands-on pouring.
Buying the rotating brewer: select the machine option linked above. "80 Paper Filters Only" is a refill pack on the same page and does not include the machine, which is why the collection page can show a lower starting price.
A five-step office brewing routine
- Put the brewer on a washable tray, an arm's length from anything electrical.
- Keep one or two measured doses in sealed containers, not an open bag.
- Fetch hot water from the approved office source rather than improvising at the desk.
- Brew into a cup you've already tested with the device.
- Toss the grounds, rinse, dry, and return the whole kit to one drawer or pouch.
If step five doesn't fit the time you have, switch to capsules, paper-filter pour-over, or brewing in the kitchenette before you give up on the habit altogether.
Which compact office option should you choose?
For filter coffee, compare a manual dripper with an automatic pouring model, and let your mug size decide between the 160 ml and 350 ml brewers. For a short, concentrated drink, look at a portable pump brewer. Add grinding only if its space, noise, and cleanup fit the office you actually work in.
Try the complete setup at home with your usual mug, water container and cleanup tray. Check how much space you need while filling and washing it. Apply the same checks to a brewer packed for a hotel room. The portable brewing collection includes the compact models discussed here.