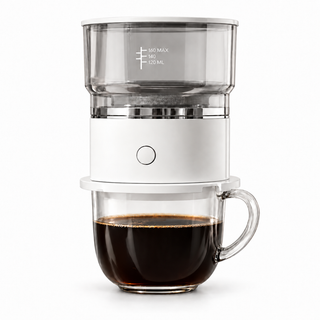
An automatic dripper can repeat the pour while the coffee still changes from cup to cup. To find a recipe you like, keep the dose and water mark steady and work on the grind first.
The Yozcoffee portable automatic coffee dripper has water markings at 120, 140 and 160 ml, a rotating tank and a reusable stainless steel filter. Use one water level as your starting point, then adjust the dose and grind gradually.
This is a dial-in guide, not another packing list. If you are still choosing hardware, the pour over coffee makers and drippers collection sets this brewer beside the glass carafe sets, folding drippers and travel kits it competes with.
Begin with one repeatable baseline
Change one variable for the next test. Keeping the rest of the recipe steady makes it easier to tell whether the adjustment helped.
For a first comparison, try 9 g of coffee at the 140 ml water mark with a medium-fine grind. This is a starting recipe, not a manufacturer requirement. Measure the dose where possible and use the same coffee for the next test.
Before pressing the button, check four things:
- The brewer sits securely on a cup that supports it, on a flat surface.
- The reusable filter is clean, with no grounds left in the mesh from yesterday.
- The coffee bed is level rather than heaped against one side.
- The tank holds externally heated water, at the same fill mark you used last time.
The brewer's batteries power the rotating mechanism; they do not heat the water. Prepare hot water separately and keep the starting temperature consistent. A 400 ml travel kettle with set temperature steps may help where the necessary power supply is available.
Use taste to choose the next grind setting
"Medium-fine" describes a region, not a number. Burr geometry and click spacing differ enough that two grinders set to 12 can produce visibly different grounds. Your grinder's numbers only mean something relative to itself.
Let the cup cool to a comfortable tasting temperature. Compare the flavor with how the filter drained, then choose one adjustment.
| What you notice | Likely direction | Change for the next brew |
|---|---|---|
| Thin, sharp, flavor fades in a second | Water is passing through too easily | Grind slightly finer |
| Dry, bitter finish with slow drainage | The bed is offering too much resistance | Grind slightly coarser |
| Balanced but too strong | Concentration is high for your taste | Drop the dose, or move up a water mark |
| Balanced but too light | Concentration is low for your taste | Add coffee, or move down a water mark |
| Suddenly muddy after a run of clean brews | Fines or dried oils are restricting flow | Clean the filter first, then reassess the grind |
Use the symptoms as clues. Roast, water and filter condition can also affect the result, so avoid treating one taste as proof of one cause.

Match dose to the three water marks
The tank is marked at 120, 140 and 160 ml. Some water stays in the grounds, so the finished serving will be smaller. These doses offer starting points for each mark:
| Tank mark | Practical starting dose | Approximate starting ratio |
|---|---|---|
| 120 ml | 7.5–8 g | about 1:15–16 |
| 140 ml | 8.5–9.5 g | about 1:15–16.5 |
| 160 ml | 10–11 g | about 1:14.5–16 |
Choose a dose and fill level you can repeat. For a larger serving, use the approved 160 ml level or prepare another cycle rather than overfilling. The pour-over ratio guide explains how to scale coffee and water together.
Stay within the filter's intended capacity. If you want a stronger cup, make a small dose adjustment and check that the bed still drains normally.
Read the cycle and the drawdown separately
The approximately 150-second pouring cycle is separate from total drawdown time. Record when the coffee finishes draining as well, especially when comparing grind settings.
Watch what happens after the tank empties. Water standing above the grounds for a long stretch points at a grind that is too fine, a filter that needs cleaning, or a dose too big for that water mark. A bed that looks dry almost immediately, paired with a thin cup, calls for a finer grind before you consider adding coffee.
Record a typical drawdown once the cup tastes good. A later change in timing can prompt you to check the grind, dose or cleanliness of the mesh.
Understand what the steel filter changes
The dual-layer 304 stainless steel filter takes paper out of the routine, which suits a desk drawer or a suitcase. It also shapes the cup, and that part gets less attention than it deserves.
Metal mesh lets more oil and fine particles through than paper, giving a fuller texture and some sediment. You can adjust grind to taste, but it will not make the filter behave exactly like paper.
If you prefer paper filtration, consider a compatible pour-over dripper. Do not add paper inside this automatic brewer unless the manufacturer specifies an appropriate filter and placement.
Adjust for roast without rebuilding the recipe
With a new bag, keep the starting dose and water level. Try a small grind adjustment first, then compare temperature separately if needed.
Avoid a large change when a small one will answer the question. Write down the combination you prefer.
Five lines is enough:
- Coffee and roast level
- Water mark
- Coffee dose
- Grinder setting
- Taste result
These notes give you a recipe to return to. A scale with a built-in timer makes dose, water weight and time easier to record.
Keep the portable routine genuinely portable
For office or hotel use, pre-measured doses can save a step. Pack the brewer dry with suitable batteries, and confirm hot water and a stable cup.
Assembled, it measures about 100 × 101.5 mm and weighs roughly 180 g without batteries. Compact, and not an all-in-one: it does not grind, does not heat water, and makes no espresso pressure. Knowing what it leaves out is what tells you the rest of the bag's contents. A fuller kit built around those gaps is covered in the six-piece travel set guide.
Pre-ground portions keep the kit small. For fresh grinding and adjustment, compare a cordless model with 38 settings with a manual option. The USB-C ceramic burr grinder needs a compatible charging source as specified in its instructions.
Clean before blaming the recipe
If flow slows, inspect and clean the filter before changing grind. Residue can restrict drainage and make a previously useful recipe behave differently.
Let the parts cool, tip out the grounds, and rinse the removable tank and filter within a few minutes. Rinse the mesh from both faces. A soft brush and mild dish soap shift dried oils where the care instructions allow it, followed by a thorough rinse. Wipe the battery-powered body with a barely damp cloth, and never put it under a tap.
Dry every part before packing or stacking. A clean filter gives you a stable baseline; a restricted one can change flow and make grind comparisons harder.
A three-brew dial-in plan
For a quick adjustment, use these checks:
- Brew one: 140 ml water, 9 g coffee, medium-fine grind. Let it cool a few minutes, then taste.
- Brew two: dose and water mark unchanged; move the grind one small step finer or coarser based on the first cup.
- Brew three: keep the better grind; adjust the dose by 0.5–1 g, and only if the cup is balanced but too strong or too weak.
Keep the recipe when you like the cup. You only need to revisit it when the coffee or result changes.
Record the water mark and grind
Save the dose, water mark and grind setting together. That gives you a useful reference the next time you fill the tank.
The rotating tank distributes the water; you still control the coffee, grind, dose and starting temperature. The travel brewing range includes grinders, kettles and scales to use with it.
A scale with timer lets you record the coffee dose and drainage time alongside the tank’s water mark.