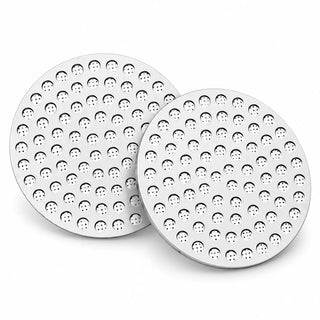
Match a puck screen to the basket’s internal diameter where it will sit, then check clearance above the tamped coffee. Yozcoffee screens come in nominal 51, 53 and 58 mm sizes and listed thicknesses of 0.8 or 1.2 mm. A screen can fit inside the basket yet leave too little room beneath the shower screen.
Check fit with your normal coffee dose. If the portafilter resists locking in, stop and check the screen, dose and clearance. Do not force it closed.
Two measurements answer different questions
Diameter tells you whether the disc lies flat inside the basket. Thickness tells you how much of the gap above the coffee it uses up. That gap is the headspace, and puck screen headspace is the number most people never check before they order.
The group size printed on your machine is not a measurement of the basket at puck height. Basket walls taper, aftermarket baskets vary, and a bigger dose pushes the puck surface up to a point where the basket may be a touch wider or narrower. Go by the basket maker's fit guidance first. If you measure it yourself, measure where the screen will rest, not at the rim.
The disc should sit flat without wedging. Do not size up just to close every sliver of gap around the edge. A screen is not a tamper, and the snuggest fit is not the safest one. If you are also shopping for the tool that compresses the coffee, our tamper sizing guide covers that separately, because tamper fit and screen fit are different problems.
One note for Breville and Sage owners: those machines use 54 mm baskets, and Yozcoffee does not list a 54 mm screen. Some people run a 53 mm disc in them, but that is a decision to make after measuring your own basket at puck level, not something to assume from the machine badge.
Compare the two Yozcoffee screen formats
These are the dimensions on our current listings. Treat them as product specs, not as a compatibility chart for every machine on the market.
| Format | Dimensions and quantity | Main buying consideration |
|---|---|---|
| 0.8 mm dual-layer | 51, 53 or 58.35 mm; one screen | Uses less headspace than the 1.2 mm option, but you still need to confirm clearance. |
| 1.2 mm dual-layer two-pack | 51, 53 or 58 mm; two identical screens in the chosen size | A spare is handy while one is soaking. The pack does not mix diameters. |
The 0.8 mm dual-layer puck screen is the one to look at when headspace is tight and its diameter matches your basket. The listing specifies 304 stainless steel, with the fine mesh facing the group head and the structured perforated side facing the coffee.
The 1.2 mm puck screen two-pack is also 304 stainless. Pick it if you have clearance to spare and would actually use a same-size backup. One screen per shot; stacking both is not how it is meant to be used.
58 mm and 58.35 mm are not the same thing, either. Neither listing promises to fit every machine sold as "58 mm," so check your basket rather than the marketing. If you want to see the screens next to the baskets and tampers they pair with, browse the full espresso gear collection.
A fit checklist before the first shot
- Confirm the exact basket. Note the model, its recommended dose range and any screen guidance. Read the machine manual too, especially if the machine already ships with or requires a specific screen.
- Prepare your normal dose. Weigh, distribute and tamp the way you always do. Stay inside the basket's intended range.
- Set one clean screen on top. It should sit flat. No tilting, no catching on the wall, no pressing it into place.
- Check available headspace. Follow the basket or machine maker's clearance procedure. Never muscle the portafilter in. A snug fit around the edge of the disc tells you nothing about the room above it.
- Stop if anything binds. Pull the portafilter, remove the screen, and recheck dose, diameter, thickness and hardware clearance before you brew. An easy lock-in is a good sign, but it is not proof that nothing touches during the shot.
If the screen will not clear your usual dose, dropping the dose slightly can help, but only while you stay within the basket's supported range. This is where basket capacity matters: our 18g vs 20g basket guide walks through how dose, basket depth and headspace trade off against each other, and a basket rated for a wider dose range, such as a 58 mm tapered 18–20 g basket, gives you more room to work with. Otherwise, go with a thinner compatible screen or skip it. There is no reliable rule that turns one millimeter of screen into a fixed number of grams to remove.
Test puck-screen fit before brewing
Check the basket while it is empty
Start dry. Confirm the recommended diameter and see whether the screen lies flat without wedging against the wall. Compare the two formats by their real diameters: a 58 mm screen and a 58.35 mm screen are not swappable by default. A two-pack gives you two of the size you picked, not a range of sizes to try.
Check again with your normal coffee dose
Now load the basket the way you normally would and follow the machine and screen instructions for checking clearance. If the handle resists on the way in, stop right there. Recheck thickness, basket depth and the dose range. Get the fit settled before you start comparing taste or adding another puck-prep tool to the routine.
Does adding a screen mean changing the recipe?
Sometimes. If clearance forces a different dose, you are no longer running the same shot. Keeping a 1:2 dose-to-yield ratio, an 18 g dose targets 36 g in the cup, while 17.5 g targets 35 g. That is just the math, not a recommended dose for your basket. If you have been eyeballing volume instead of weighing output, our guide to shot weight vs volume explains why the scale matters here.
A coffee scale with a built-in timer makes that change easy to track. This one has a 2 kg maximum load and a 140 × 124 mm platform, so check drip-tray space and cup clearance before choosing it for espresso.
Once the fit is sorted, pull a few shots with the same beans, dose and target yield. Write down whether the screen was in, the grind setting, shot time and how it tasted. If you change the grind, note that too. You are trying to find out whether the extra step improves your routine, not to prove that a cleaner puck tastes better.
When a puck screen is useful—and when to skip it
A reusable screen separates loose grounds from the shower screen and is designed to distribute incoming water. It adds a part to wash after brewing. Continue distributing and tamping the coffee as usual.
Skip an optional screen if you cannot verify clearance, if the extra cleaning annoys you, or if you are hoping it will paper over inconsistent grinding and prep. It will not. And if your machine requires a screen, follow the manual rather than pulling it out on the strength of generic advice.
Already fighting an extraction problem? Work through the puck-preparation checklist first. If the shot still sprays or runs unevenly, our channeling troubleshooting guide goes through those symptoms one by one. A screen alone will not make them go away.
Keep the screen usable
Finish the shot and release pressure the way your machine's procedure says before you take the portafilter off. The screen comes out hot, so let it cool before you touch it. Rinse the residue off gently and dry it before it goes back in the drawer.
Follow the care instructions for your specific screen. The two-pack listing allows an occasional soak in a cleaner made for stainless-steel espresso equipment; use the cleaner's directions and rinse well. Do not bend the mesh, and do not let a screen stand in for the machine's regular cleaning schedule.
Product specifications checked September 20, 2026. Cover: AI-generated editorial illustration, not a product photograph or fit demonstration.