Clean a cold drip coffee maker soon after brewing, before residue dries. Remove the grounds, separate the approved parts, rinse the filter and flush the valve as directed. Wash coffee-contact surfaces using the recommended method, then let the parts dry.
Keep needles, paper clips and other sharp objects out of the valve. If approved flushing does not clear it, follow the manufacturer's servicing or replacement advice.
What you need
- Mild, unscented dish detergent
- Warm water, not boiling, and never straight from a hot tap onto cold glass
- A soft bottle brush that reaches the base curve of the carafe
- A narrow soft brush for the mesh disc and the valve inlet
- A lint-free towel or an open drying rack
- The assembly diagram that came in the box
Avoid abrasive tools and unapproved cleaning products. Check the care instructions for the exact brewer, including the valve, seals and transparent parts.
Clean immediately after brewing
Clean soon after use so residue has less chance to dry onto the mesh and seals. Use only the soaking and brushing methods approved for those parts.
Transfer and refrigerate the finished coffee as appropriate, then remove the grounds before rinsing. A paper filter can help lift them out together.
Six Steps to Clean the Cold-Drip Brewer
make the brewer safe to handle
Close the flow control, empty the remaining water and place the brewer on a stable surface. Separate the chambers, basket, filter and carafe in the order described in the manual.
Avoid sudden temperature changes when washing glass. Let cold components warm gradually and follow their care instructions.
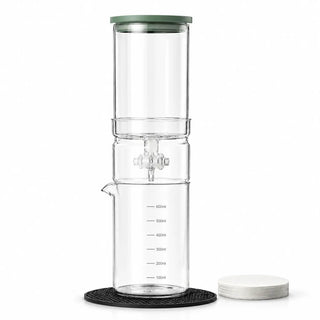
The slider-controlled manual ice drip maker comes apart into an upper ice-water chamber, a removable coffee basket, a roughly 300-mesh stainless filter disc and the glass carafe. Knowing which joint is meant to turn saves you from twisting a glass collar that was never designed to move.
For the slider-controlled Yozcoffee brewer, the upper ice-water chamber holds 450 ml and the lower glass carafe holds 650 ml. These are separate vessel capacities, not a promise of finished coffee yield. Keep water and ice within the upper chamber’s fill limit.
empty the coffee basket
Remove grounds into the appropriate waste or compost facility before rinsing. Use only an approved soft tool if they stick.
Rinse the basket as instructed, checking the walls and outlet for trapped grounds. Inspect it before reassembly.
rinse the filter from both sides
Rinse both faces of removable mesh where the care instructions permit. Support it gently and avoid pressure that could deform it.
Use a soft brush with light pressure if approved. Inspect for remaining residue or damage rather than probing the mesh with a sharp tool.
If flow slows again after cleaning, check the filter, dose and bed preparation. Fine particles can contribute to a restriction. A coarser, more even grind may help if fines are restricting flow. Avoid harder scrubbing, which can damage the filter.
clean the valve without damaging it

Remove the valve only if the product is built for user disassembly. Some have a pressed seat that will not go back once it is out. Lay the seals, washers and fittings down in the order they came off. A phone photo before you separate anything is worth having, though the printed diagram wins if the two disagree.
Flush the valve using the manual's procedure. Move the control only as directed and avoid forcing a stiff mechanism.
Do not force the control or insert a needle into the opening. If approved cleaning does not restore flow, ask the manufacturer about service or replacement. Compare clean-water flow with your previously recorded drip rate before adding coffee again.
wash glass and polymer parts gently
Clean the carafe base and underside of the lid as well as the visible walls. Use an approved mild detergent and rinse thoroughly.
Avoid abrasive pads on clear plastic and glass. Remove seals only where the design allows it, and clean the grooves behind them according to the instructions.
The 600 ml glass cold drip tower has several glass chambers, a silicone lid, the flow valve and a non-slip mat. Wash each by its material and count the small parts back in. The seals around the flow control are the easiest thing in the kitchen to lose down a drain.
dry completely
Lay the parts out separately with the openings facing air. Water trapped inside a reassembled cold brew and cold drip setup turns stale within a day or two and gives the next batch a musty edge you will spend a week blaming on the beans.
Allow the interior spaces to dry as well as the outside surfaces. Check valve passages, filter frames and lid channels before reassembly. Store fragile parts where they will not be knocked.
A quick after-every-brew routine
- Grounds and paper out.
- Basket and mesh rinsed, both directions.
- Clean water flushed through the open valve.
- Coffee-contact surfaces washed with mild detergent.
- Rinsed until no detergent smell remains.
- Every part air-dried separately.
Cleaning promptly usually takes less work than removing dried residue later.
When to deep clean
Follow the care schedule and investigate changes in flow, persistent residue or odor. These may call for a more thorough approved clean.
Use descalers or soaking solutions only when approved for the specific materials and model. A product intended for a kettle is not automatically suitable for the brewer's seals and valve.
How to diagnose a clogged brewer
Water does not leave the upper chamber
Check whether the upper valve is set correctly. If it remains restricted, follow the manual's procedure for flushing and inspecting the seals. Do not force the control or disassemble parts beyond the approved steps.
Water enters the coffee but does not exit
Pooling can indicate a restriction in the bed or lower filter. Follow the brewer's troubleshooting procedure, then check grind, dose and cleanliness before the next batch.
Flow begins normally, then slows sharply
Fines can collect at the filter as the bed becomes saturated. Inspect the mesh and compare grind consistency if the flow slows during a batch. The guide to cleaning a coffee grinder explains how to remove retained grounds without wetting parts that need dry care.
The valve drips even when closed
If it leaks, check assembly and seals according to the manual. Do not tighten harder to compensate. Seek servicing advice if it continues.
Prevent clogs before they start
A reasonably consistent grind can help with filtration. Compare a burr grinder with a usable adjustment range if your current grinder produces many fines. Seat the filter correctly, keep the bed untamped and follow the cleaning routine.
Record the flow after cleaning. If it later slows at the same valve setting with the same recipe, inspect the filter and water path for residue. That record also helps estimate how long a full batch should take.
The no-clog rule
Prompt cleaning is easier than removing dried residue. Empty the grounds, clean the filter and valve as directed, and dry the parts before storage. Follow the care instructions for each item of cold coffee gear rather than assuming every component can be washed the same way.