How often you move affects what is worth packing. A grinder may be convenient during a month in one apartment and less appealing when you change accommodation every few days.
Set a space or weight limit for the kit, then check what your usual accommodation provides. Add a grinder and scale if you expect to use them regularly.
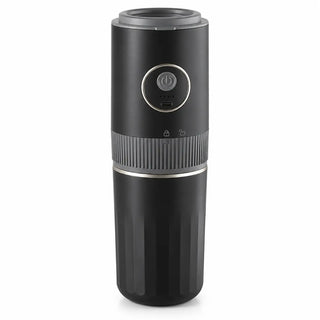
If your routine is one cup, ground fresh, with hot water already handled by the kitchen or a hotel kettle, the Yozcoffee portable electric grinder and pour-over brewer folds the whole workflow into a single 245 mm (9.6 in) stack: electric grinder, reusable steel filter, brewer, and a 350 ml (12 oz) cup. It weighs about 0.7 kg (1.5 lb), which is slow-travel territory. Put that number next to your laptop and charger before you commit it to a one-bag trip.
Choose gear by travel rhythm
Fast travel: simplify aggressively
When you move every few days, favor parts that dry fast and pack flat. A dripper, a sleeve of filters, a mug, and a few sealed portions of coffee cover most mornings as long as there is hot water somewhere nearby.
That stripped-down kit works in hotel rooms, coworking kitchens, and hostels alike. Put the pieces on a scale as you would actually carry them, with lids and cases, instead of trusting the spec-sheet weight.
Slow travel: carry tools that improve daily life
Stay a month or longer and the math flips. A burr grinder lets you buy whatever the local roaster has instead of hunting for pre-ground, and a small scale makes the recipe repeatable even when every apartment hands you a different mug and kettle.
When the pace changes, revisit the kit. A week of hopping between cities wants fewer pieces than a three-month lease, and there is no rule that says the bag has to look the same on both.
Home-base travel: prioritize workflow
If you rent an apartment for months and take short trips out of it, run two kits. The base gets the electric grinder and a proper pouring kettle. The weekend bag gets a dripper, a hand grinder, and a mug, and it stays packed so you never rebuild it on a Friday night. Leave the kettle home whenever the destination already has one. The same split works if you drive instead of fly; the road-trip checklist covers how the car version differs.
The six questions every item must answer
Does it depend on a specific kitchen?
Anything that heats water drags compatibility along with it. Before you pack a kettle, check the heat source you are allowed to use, the electrical rating, and the house rules at each stop.
Match the appliance rating to the local supply. A plug adapter changes the shape of the pins, not the voltage, and a 120 V kettle on a 230 V outlet is a short story with a bad ending. For a longer stay, borrowing whatever the apartment provides is often simpler than carrying your own.
Is it quiet enough for shared spaces?
In shared accommodation, consider grinder noise and the time you brew. Noise and grinding time vary by model and dose. Use electric grinders on a stable surface, away from sleeping areas where possible. The rechargeable grinder guide covers charging and adjustment.
Can it be cleaned with one small sink?
Pick a cleanup you can finish in whatever sink you are given, including a bathroom basin. Paper filters take most of the grounds with them; reusable filters need a proper rinse. Either way, budget time for drying, because a damp dripper zipped into a bag is how mold happens.
Can you replace it without derailing work?
Know where you would get replacement filters, cables, and small parts on the road. Save the model number and manual offline so they are there when the connection is not.
Does it nest or pack flat?
Measure the packed object, not the product photo. Handles, lids, cables, and protective cases are what actually fill a bag. A grinder that drops inside the mug, or a dripper that folds to 15 mm (0.6 in), saves more room than a slightly smaller tool that demands its own rigid box.
Will you use it at least four days a week?
Keep only what you use most mornings. If you want a milk drink once a week, buying it at a café costs less effort than carrying a frother and cleaning it every time.
A minimal travel coffee gear list
Compact brewer
A stable dripper is the heart of the kit. Metal filtration means nothing to restock; paper means a cleaner cup and a faster cleanup. Check that the brewer sits securely on the mug you are bringing, and that your usual destinations sell the filter size you need, because a cone with no filters is a paperweight.
Grinder or pre-ground plan
A hand grinder never needs charging but costs a couple of minutes of effort per cup. An electric one is easier on the wrist, while pre-ground portions keep transit days simple. Most nomads end up with two of the three depending on the trip.
Durable mug
One insulated mug handles brewing, drinking, and transit. The lid matters more than the handle. A 300 ml (10 oz) insulated stainless cup is worth comparing for fit and durability; make sure your dripper sits securely on its rim and wrap it before it goes in the bag.
Coffee storage
Buy enough to cover the gap until the next roaster, not a month's supply by default. Seal it well and keep it away from heat, which in a backpack usually means the side that is not against your back.
Scale, only if it changes your brewing
The digital coffee scale with timer reads in 0.1 g steps, weighs up to 2 kg (4.4 lb), and charges over USB. Check its footprint and charging needs against the rest of the kit. If you would rather skip it, pre-measured portions get you most of the way there.
Cleaning pouch
Pack a small brush, a cloth, and something to collect spent grounds. If damp parts have to travel in a separate bag for a few hours, unpack and dry them as soon as you land somewhere.

A repeatable nomad recipe
One recipe that survives changing water and borrowed equipment:
- 15 g of coffee, 240 g of water just off the boil, around 93 °C (200 °F).
- Grind medium-fine.
- Wet the bed evenly with 30–45 g of water.
- Wait 30–45 seconds.
- Add the rest in two or three pours.
- Taste, and change only the grind next time.
Water chemistry shifts from city to city, so do not chase an exact brew time in every apartment. Weak and sour means grind finer. Harsh and drying means grind coarser. Hold dose and water steady until the new beans make sense, and if you carry a scale, brewing by weight with a timer lets you compare the same recipe across very different kitchens.
Power and battery discipline
Label cables if several devices share a connector. Charge when it is convenient rather than when it is urgent, store powered gear dry, and use the travel lock or packing method the manual describes so a button does not get pressed in transit.
Check the current airline and destination rules for the specific battery-powered gear you carry; lithium batteries generally belong in the cabin, not checked luggage. Pack the grinder clean and follow its storage instructions.
When an integrated setup is worth the weight
A stacked unit makes sense for small daily brews during longer stays where hot water is reliable. Weigh it, check which parts detach for cleaning, and look at repair options before choosing it over separate pieces.
A fully manual fitted kit is heavier than a bare dripper but needs no power at all. The 6-piece portable pour-over set packs a grinder, a 250 ml (8.5 oz) pouring kettle, a dripper, a cup, a bean canister, and a scoop into an EVA case. Its kettle pours; it does not heat, so local hot water is still the thing you have to solve. Both routes, plus the lighter options, live in the coffee anywhere collection.
What is not worth carrying?
Skip duplicates and bulky accessories that serve a job you rarely do. Confirm replacement filters and parts are available, and check electrical compatibility for every destination, because a "travel" label on the box says nothing about voltage.
On a travel day, it is fine to leave the kit packed and buy a cup. Build the setup for the mornings when you will actually enjoy using it.
A foldable steel dripper saves packed space and uses reusable mesh. Check that it sits securely on your mug and allow time to rinse and dry it.