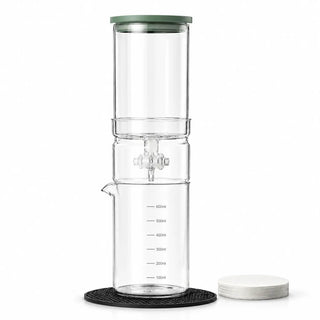
The Yozcoffee slider-controlled manual brewer suggests starting at 7–8 drops every 10 seconds. Use that as a reference for this model, then check how the batch flows and tastes.
For the slider-controlled Yozcoffee brewer, the upper ice-water chamber holds 450 ml and the lower glass carafe holds 650 ml. These are separate vessel capacities, not a promise of finished coffee yield. Keep water and ice within the upper chamber’s fill limit.
Check for separated drops and even wetting, then recheck flow during brewing. This needs more observation than immersion cold brew.
Key Takeaways
- For the listed slider-controlled model, start around 7–8 drops every 10 seconds.
- A drop count is model-specific because outlet size changes drop volume.
- Check upper flow and lower drainage; opening the valve cannot fix a clogged bed.
Why drops per minute are only a local measurement
Drops vary in size with the outlet and conditions. A count is useful for repeating your own setup, but cannot be transferred directly to every brewer.
For a clearer record, measure collected water or coffee over a timed interval where the instructions permit. Note whether the measurement was taken with coffee in place, since the bed changes flow.
The slider-controlled manual ice drip maker has an external slider, which is what makes small corrections possible without opening the tower. Its 7–8 drops per 10 seconds is specific to that valve. The 600 ml glass tower uses a different adjustable valve and needs its own baseline, established the same way.
Measure and Monitor Cold-Drip Flow
How to count cold drip flow accurately
Count over a longer interval to reduce the effect of an irregular drop:
- Fill the upper chamber as the recipe calls for.
- Set the valve while watching the outlet above the coffee.
- Count drops for 30 seconds and double the number.
- Wait five minutes so the bed wets through and the system settles.
- Count the upper drops again, then watch what is leaving the bottom of the basket.
- Write down the rate, dose, grind setting, water, ice split and room temperature.
At 7–8 drops per 10 seconds you should count 21–24 in a 30-second window. Repeat the count before changing the valve. A trend is easier to interpret than one short interval, but it does not identify the cause by itself. Putting a 0.1 g scale with a timer under the carafe gives you a second reading that does not depend on your eyes — grams collected against minutes elapsed, checked twice.
What a healthy flow looks like
| Observation | Likely meaning | First response |
|---|---|---|
| Separated, regular drops | Flow is where you want it | Leave it alone, check in an hour |
| Continuous thin stream | Valve is open too far | Close it a fraction and wait five minutes |
| Long pauses or nothing at all | Valve is choked or blocked | Inspect the outlet, then open slightly |
| Top steady, bottom slowing | Bed or filter is loading up with fines | Look for pooling; go coarser next batch |
| One deep wet crater in the bed | Water is channeling | Level and pre-wet the grounds next time |
Output can lag behind the upper drip while the grounds wet. Watch for sustained pooling or a stopped lower outlet rather than assuming the rates must match immediately.
Why the drip rate changes during brewing
Falling water pressure
Flow may change as the upper water level falls. Recheck during the batch and note how much adjustment your model needs.
Melting ice
With ice in the chamber, liquid supply depends on melting as well as the valve. Keep the ice format consistent when comparing recipes.
Coffee-bed saturation
The bed and filter can become more restrictive as particles move during brewing. Check them if the lower flow slows unexpectedly.
Valve contamination
If the same setting no longer produces familiar flow, inspect for residue and follow the approved procedure to clean the valve. Recheck the recipe afterward.
How flow affects flavor
Flow affects contact with the bed, but speed alone does not predict flavor.
Look for even wetting and manageable drainage. A fast or slow batch may need adjustment, but taste it and inspect the bed before deciding which variable to change.
Gently mix the collected coffee before tasting. An early sample may not represent the strength and flavor of the complete batch.
Adjust Fast or Slow Flow
How to adjust a flow that is too fast
If the rate is above your intended setting, reduce it slightly and observe. If the upper rate is as expected, inspect the bed and lower drainage instead.
If the observations point to grind, try a small change in cold drip grind size. Keep ratio steady and prepare the bed without tamping, following the brewer's instructions.
How to adjust a flow that is too slow
Check the outlet is open and clean first, because that costs nothing. If water is pooling above the coffee while the lower drip fades out, the restriction sits in the bed or the mesh: too fine a grind, too many fines, a compacted bed, or a filter that never got rinsed properly after the last brew.
If flow has stopped, follow the brewer's instructions to stop and inspect it. Check the valve, filter and bed before changing grind or dose. Replace worn parts with compatible cold brew gear components where needed.

Separate drip rate from total brew time
Drop size, changes in rate, melting ice and retained water all affect total duration. Measure the endpoint of a complete batch instead of calculating it from one short count.
The companion piece on how long cold drip actually takes covers estimating from collected weight, with reminders to recheck as the flow changes. This article has a narrower job: make the flow stable enough that it tells you something when it changes.
A repeatable dialing-in routine
Start with the manufacturer's recipe and keep dose, total water, ice and filter arrangement the same for the first comparison.
Use taste with the flow observations. Inspect and clean a restricted filter before adjusting the recipe, then make one change and repeat it.
A scale with a built-in timer lets you measure dose, collected coffee and elapsed time on one device. Keep the readings with your recipe so you can compare batches.
Start with a count, finish with taste
Record the starting rate and any adjustments during the batch. That gives the next brew a more useful reference than one count at the start.